EXPORT DATA FROM SQL SERVER 2014
WIZARD
Hi all,
Today i came across with different type of requirement, Sometimes we need to move/Copy our NAV data from one Database to others, OR One server to other server.
we can do also this task using "Departments -> Administration -> Application Setup -> RapidStart Services for Microsoft Dynamics NAV -> Config. Package Card.
But in this scenario, BLOB fields are not copied, Due to overcome this we have to do using SQL Server.
Run the SQL Server Import and
Export Wizard to copy data between a variety of sources and destinations.
If you don't have
Microsoft SQL Server installed on your computer, you can install the SQL
Server Import and Export Wizard by installing SQL Server Data Tools (SSDT).
Steps for exporting table data from one
server to another server database table.
Step 1:
In SQL Server Management
Studio, connect to an instance of the SQL Server Database Engine, expand Databases,
right-click a database, point to Tasks, and then click
one of the following options [See the bellow screenshot].
Step 2:
Click NEXT Button and select the Source, See
the bellow screenshot for better understanding.
NOTE:
After clicking Next button, you will get
destination wizard, here you have various option to export the data.
Like:
MS Excel, MS Access, Flat File destination, Sql Server e.t.c, In my demo i
select SQL SERVER.
Step 3:
In this wizard select the Destination (Client,
Server Name, Authentication, Database) And then click on NEXT Button, See the bellow screenshot for better
understanding.
Step 4:
Specify weather to copy one or more
tables/views or to copy the results of the query from the data source.
In this wizard we have 2 options.
Option
1: Copy data from one or more
tables or views
Using this option, We can copy multiple
tables/views data at a time, but in this we can't filter data.
Option
2: Write query to specify the
data to transfer
Using this option, we can filter the data, but
in this option we can copy single tabale data ata time.
In my demo i used 2nd option where we can write query,
And click on NEXT Button, See the bellow screenshot for better understanding.
Step 5: Provide a source query for fetching the data
from source server And then click on NEXT Button, see the bellow screenshot.
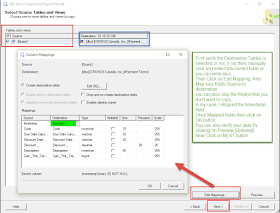
Step 6: Select Source tables/views for mapping
the data to destination.3
NOTE:
First verify the Destination Tables is selected or not, if not then,
manually click and select the correct table or you can write also, Then Click
on Edit Mapping, And Map your fields Source to destination, you can also skip
the filed(s) that you don't want to copy, In my case, I skipped the timestamp
field.
Once Mapped fields then click on OK button.
You can also verify your data by clicking on Preview [Optional].
Now Click on NEXT button, see the bellow screenshot.
Step 7: Save and Run Package,
In this wizard we can run our query for
transferring the source data to desatination.
We can also save our package for further
execution or documention.
In my demo i select both option RUN &
Save, you can ommit the SAVE option if you don’t want to create package.
If you selected Save option then only Save
dialog will display, See the bellow screenshot for better understanding.
Click on NEXT button. A Complete the Wizard
dialog box display, now click on Finish button, see the bellow screenshot.
After successfully executing the all query, A
completion report will display, You can save your report,or Email.


No comments:
Post a Comment